
This blog post is from Glenys Williams, Assistant Principal at Fendalton Open-Air Primary School
Follow Glenys at: @glenysmwilliams, gwplreflections.blogspot.co.nz
Last week I was working in the Year 6 classes at school. The leader of our senior syndicate asked me to help her students create a slideshow showing their recently made Wearable Arts costumes to celebrate and share the product of their inquiry. She had an end goal in mind but wasn’t sure how to achieve it. How could the students place a photo of themselves in costume against an alternative background? She set me the challenge of finding out.
During the morning I worked with a small group of interested students. Together we suggested ideas, Googled, used Help menus and problem-solved to discover, trial and record the solution. This focused but largely undirected learning stimulated amazing conversation about the features, techniques and tools within different applications.
By the afternoon the students and I were teaching their Year 6 classmates how to create Microsoft Powerpoint slides showing themselves in costume in front of a relevant (or funny!) background. Below are some examples of what the students independently created.
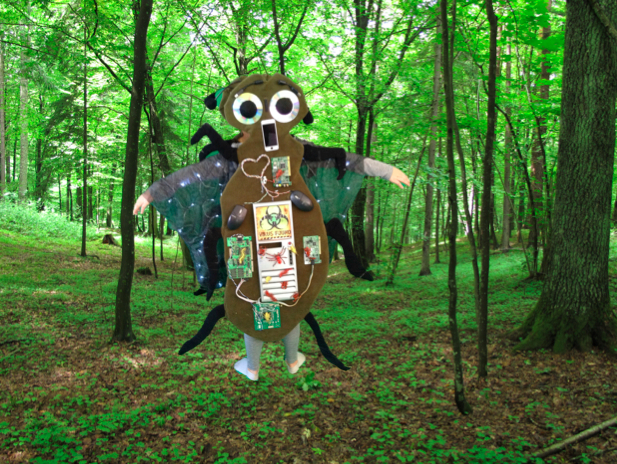 |
 |

While I could have asked around the staff to see if anyone could teach me this new skill, learning alongside the students and discovering the solution for ourselves was incredibly powerful and highly motivating. The process of suggesting solutions, trial and error, helping and supporting each other made the discovering just as exciting and meaningful as creating the end products. Teaching their peers then gave the students the opportunity to consolidate their new learning.
At the end of the day the children and I were buzzing. We couldn’t wait to share our photos and celebrate our success. It was just another example of why I love being a teacher. To live in a time when we have access to amazing technology is such a privilege so I believe it is important we utilise these tools to their full potential while remaining mindful of how we use them and why.
Thank you for setting me this challenge Judy. I look forward to the next one!
Create. Learn. Share. Enjoy.
Instructions for how to add a background to a green screen photo:
1. Take a photo of a person or object against a plain background (e.g a sheet. Green is preferable but not essential).
2. Take a photo of a landscape or save a Creative Commons image from the Internet.
3. Open Microsoft Powerpoint (2010 or later).
4. Select a slide style e.g. White.
5. Delete any text boxes or other formatting guides.
6. Insert>Photo>select source for the green screen photo of the person or object.
7. Format Picture>Adjust>Remove background. The background to be deleted will turn purple. Adjust this using the sizing handles.
For more detailed information about selecting the background for removal type “Remove a picture background” in the Help menu.
8. Click outside the picture to remove the background.
9. Insert>Photo>select source for your landscape image.
10. Arrange>Send to back
11. Resize the background to fit the slide if needed. Place the foreground image where desired.
No comments:
Post a Comment